Sunday 22 December 2013

Recycled phone case

Hi fellow crafters!!

Just when I was thinking about throwing away my old phone case ,that is when an idea sparked...
WHY NOT RECYCLE IT??? Could save me a few bucks, give a personal touch and get myself a bit of advertisement ;-) as well.


Materials required-
  •  Old phone case
  • Acrylic paint-    Gold (for base), metallic blue, metallic red, brown, white, metallic green
  • Mod Podge-      Acts as sealant
  • Brushes -           For painting
  • Super glue
  • Rhinestones -    White, Red
  • Hairdryer-         To speed up process...
  • CD marker
Method-
  • Clean the surface of the phone case with a clean, dry cloth.
  • Using a flat brush apply 3-4 coats of gold acrylic paint.
  • Few points have to be kept in mind while applying paint. Make sure the you apply generous amount of paint from top to bottom evenly. Make sure the brush doesn't stop halfway through while painting or it may leave unwanted brush marks.
  • Make sure that each layer dries before next layer of paint is applied. Can use a hair dryer for faster drying. Apply each layer horizontally and vertically alternatively.
  • It should be something like this....
  • Draw outline of the peacock design and then fill it with colour.

  • Start giving details with colours and finally outline.
  • Seal the paint with Mod Podge, so that it can resist wear and tear.
  • Stick white rhinestones on the feathers. Fill the background with leaves and stick red rhinestones like fruits.
  • Final result..

Hope you enjoyed..

....Exploring....


Monday 25 November 2013

Newsprint transfer on wood.


Hi fellow crafters and craft lovers,

In the task to complete a commission order of a bulk 200 keychains, I had to go through the process of giving a background colour for my wooden base. This gave me a wider scope for colour combinations, rather than a plain wooden background (which would have been very monotonous for me to work as well). 

I happen to stumble upon the idea of transferring newsprint on wood. I found it easy and fun. Although I came across many techniques, I decided to complete this project using my favourite material- MOD PODGE. The results were amazing as well!!

Let's begin..
Materials required-


  • Any wooden base  (I have taken keychain in this case)
  • Mod Podge
  • Flat brush
  • Stylus or any used credit card
  • Newspaper            (Cut to required size)       

Method-

  • Apply a generous even layer of Mod Podge over the wood with the help of flat brush.
  • Place the paper on top. Make sure the newsprint to be transferred comes in contact with the Mod Podge layer. Remember the transferred image is always a mirror image!!!
  • The paper can be either a news paper or any used A4 sheet with print on it. black print is preferable. Avoid glossy and thick sheets.
  • Leave for few seconds for it to set.
  • With the help of stylus or a used credit/debit card, carefully rub over the paper with the edge with pressure just enough to transfer the print. Make sure the paper doesn't peel. This is the process where the news print is transferred to the wood. 
  • Now slowly peel off the paper and the apply a thin layer of mod podge
  • Leave it to dry. Result....

You can also transfer images by the same method from paper to wood.
It is difficult to decipher what image I have transferred but I just wanted a part of a big print to serve the purpose of a background.

Below are the completed keychains with news print backgorund...


Hope the above tutorial was useful..
See you in the next article!!

..Exploring..


Saturday 9 November 2013

A great tip.

Hello fellow crafters,

I came across something very useful and creative related to my previous post- Sand painted/jute flower vase
where I learnt to smoothen the rough ends of a plastic bottle when cut.

Below is the link -
http://www.goodshomedesign.com/beautiful-diy-plastic-bottles/

DIY-with-plastic-bottles
Lovely.. isn't it!

The plastic bottle is cut and then pressed against a heated iron box to smoothen its edges.  A baking paper or grease proof paper can be used in between the bottle and the hot iron box to avoid damaging the iron box surface. This is as suggested by the author Denise Meneghello 

For more about the author and her creative ideas , visit -http://www.denisemeneghello.com.br/

Enjoy!!


Monday 7 October 2013

Sand painted/jute flower vase

Hello fellow crafters,

Thought I must share a recycling project today. This is a simple project I had taught at my school.


It is a flower vase made out of plastic bottle. Pardon me as I don't have a step by step picture, but will make sure I give you a good explanation. Lets start off!!

Materials required-

  • Plastic bottle- I have used a small pet bottle.
  • Blade-            for cutting the top part of the bottle
  • Soft sand-      Beach sand is the best as it is really fine and gives a finished look. If you have access only to normal sand, use a sieve to make it finer. (Make sure not to use the sieve again for cooking purposes!! You don't want sand in your food!!)
  • Bowl-            to mix glue and water
  • Brush-           decent size flat brush is preferred  to apply glue to the bottle
  • Water colours/ sponge/brush
  • old newspaper
  • Decorative shells, plastic mirrors, rhinestones for decoration
  • Super strong white glue/ Fevicol
Method-
  1. Cut the top portion of the bottle with blade. Make sure you cut it out evenly without any plastic protruding.
  2. Carry out the whole project on a n old newspaper, so that it is easy to clean and re-store the sand falling off for next projects.
  3. Mix glue with water. Consistency should be 2:1, glue:water ratio. Apply glue on one side of the bottle. Make sure it is evenly spread. Sprinkle sand all over the area where glue was applied, keeping the bottle over the news paper. 
  4. Leave it to dry.
  5. Once it is dry, do the same for the other side as well. You can proceed with this step, if you can handle when the other side is bit damp.
  6. After both the sides have dried completely, tap the bottle gently so that the excess sand falls off and you can re apply on areas where the bottle is not covered with sand. Leave to dry completely.
  7. I you desire, you can apply a second coat of sand by repeating step 3, 4, 5. This gives a more finished look.
  8. Now for the fun part. Colouring!! Mix water colour to a very watery consistency with the help of brush and with the help of a sponge, apply colour to the sand coated bottle.
  9. Sponge is easier than brush as it absorbs more colour and can be applied to a wide area as well.
  10. You can apply any number of colours,but make sure you keep it bright and beautiful. 
  11. Gradient technique- You can also use the gradient technique, where for example you apply orange colour to the bottom half and yellow to the top half, when orange is still wet. This helps the colours to merge in the centre, giving a beautiful effect. Make sure you apply the yellow colour from the top to the centre to maintain a fresh look.
  12. Leave to dry completely.
  13. Embellish your vase by gluing decorative mirrors or shells of your choice. Once it is dry, it is ready to decorate your table with this cute little vase with flowers.
Tip- Put in some sand into the vase before you ppour water and place flowers as this helps the vase stand better without tipping off. ;-)

Below is a variation.
I have coverd up most of the bottle with jute rope, by applying glue on the bottle first. Then applied sand for the rest of the areas, painted everything and embellished. Make sure the rope is stuck really tight.


That's it for today!! Hope you learnt something simple, useful and innovative.
Meet you in the next article with a small tip for this project!!

..Exploring..

Don't forget to pop in to my other blog http://nailomaniac.blogspot.co.uk/ to explore the world of nails, manicure, nail art and more.


Sunday 22 September 2013

Photography- gateway to the online market.

Hi fellow craft and art lovers,

I thought I must share about my photography stunts that I did to get my pictures right. 
As we all know (and as I have come to know very well),  photography is THE one and only gateway for our online market. It is the first and most impression for online customers and helps boost sale.

I am not a very professional or good photographer myself, but being an artist, I do have a basic sense of how my photos should look like. 

Initially I had to trouble my husband a lot (who is a wonderful photographer), to take pictures of my products with my Canon 550D. I used to show him reference snaps from my google search of similar products (and a lot of pestering of course!!!). 
As I had a bunch of products in hand, my husband din't have much time and I had to put up my first stall immediately, I had to take pictures in a hurry, which I was not satisfied with. These were the first set of pictures I had posted on fb , but which have been removed now.They looked something like this...


In the back ground is a plain white handmade sheet.

But something was lacking.. I din't get the professional touch that I wanted..
So I further researched on my you tube videos and stumbled upon videos which confused me all the more and demanded quite a bit if costly purchases, which I wasn't ready for.

Climate is also a very important factor as early morning and evening natural light is best for photographers. I was deprived of this may a times due to constantly changing sunlight. I have experiences of many days where I had the best lighting but no time, enough time but left sitting idle with no proper lighting. This made me try various different light sources, but nothing gave me satisfying results.
The next set of pictures were slightly better off. They looked like this.. I managed to take these with natural light.


In the background, is a handmade jewellery display mannequin(for which I will be uploading a tutorial very soon!!!)

I recently decided to go full fledged on my online shop http://www.etsy.com/shop/SketchandString, for which I need more professional pictures and it isn't a feasible idea hiring a photographer. 
I stumbled upon the below link, which was from etsy and was pretty helpful

I decided to give a plain white background for which I used my drawing sheets and voila!!!


My photoshop skills have helped me a lot to refine my pictures and get the perfect effect.

Now they definitely look really professional. Just the way that I want them to be. Promise to upload a step by step tutorial On how to get this picture perfect effect without much fuss!!

Below are pictures before and now

Before
Now
Hope you enjoyed this article.. Will get reconnected very soon.


..Exploring..


Don't forget to pop in to my other blog http://nailomaniac.blogspot.co.uk/ to explore the world of nails, manicure, nail art and more.


Monday 2 September 2013

Flower vase glass painting..

Hello
This is my first ever online step by step tutorial. This is a commission piece for one of my dearest friends.
I am very excited about it.. So, with this same excitement lets get started... My plain glass vase has finally arrived...Time to open the package....

Materials needed-

  • Glass vase- any shape or size you like. I have used a 8cm cube clear glass vase.
  • Glass paints- Pebeo vitrail. I have used lemon yellow,violet, turquoise, green, orange, pink.
  • Glass liner- I have used Marabu brand purple, gold.. works well..
  • Clean spirit- to clean brushes
  • and of course brushes to apply colours
Method-

Step 1- Draw the outline of desired  design. I have made a free hand design with sunflower as my main subject, amidst wavy lines. Draw on all four sides. Leave it to dry for an hour.


Step 2- Fill in the colours keeping in mind colour contrast. For example,if you paint the flower yellow, dot the petals with red/orange/any dark colour. Fill in each wavy portion with different colours, making sure adjacent colours are different in each wave.


Dot the waves as well... Outline the flower with golden liner above the purple liner already done. This makes the flower stand out form the rest of the design.
Similarly finish all the 4 sides.. 

2 sides done... I left it to dry overnight after completing 2 adjacent sides, as it was inconvenient to do other two without these completely drying...  

Completed other two sides the next day...Voila!!!


I have made all my flowers with different colors and given them golden outline.


This beauty is off to my friend's place...
Hope you enjoyed the project. More to come!!

...Exploring....

Don't forget to pop in to my other blog http://nailomaniac.blogspot.co.uk/ to explore the world of nails, manicure, nail art and more.


Friday 23 August 2013

Where am I? What am I doing now? What next?

These questions have always haunted me as an artist..Sometimes I come up with answers, but sometimes I am totally blank. I see this article as an opportunity to assess myself which would help me move forward in a positive way.. Making it as short as possible....

I see my whole life majorly influenced by people around me. 'Pure, untouched, myself ' moments  have been very miniscule wherein, I have explored myself and been able to 'become God like' and make creations satisfying my soul... The journey until now was exciting, confusing, happy, sad, lot of expectations (expectations fulfilled, expectations shattered), meaningful, meaningless, some better off unaware of the meaning, ecstatic, cheated, oblivious, consciously, unconsciously...But everything contributed to my experiences in life..


I need to rewind a bit backwards, from where my Mother has been/is being a great great source of support. From allowing me to pursue what I want, gracefully accepting my foolishness, insanity many a times, channelising me and my energies the right way, she has endured me a lot, help me choose my path and make me what I am today.

The day I started me and my sister started the first craft class, during my 10th grade holidays (oh my gosh!! 10 years back!!), is still vivid.Transportation was arranged everyday so that we did not feel the scorching sun, was a luxury. I went on to learn thread work, glass painting, chola wood work, hand embroidery, a bit of stitching (which I didn't succeed), fabric painting, drawing/painting, pot painting, aluminium foil work. I adore and my respects to my teacher, who introduced me to the world of Arts and Crafts. Another important person in my life...

Pursuing my graduation as a Textile Designer, enhanced my experience of art, but I had much work to do to stand out of the crowd. I had the pleasure of putting up art shows, meeting wonderful/artful people, see outstanding works of art, rummage through exotic art books, learn designs, play with tie and dye, batik, create wonderful textile prints, illustrate and sketch like a lunatic. Maturing form an amateur to a pro!!

The next year after graduation, I found myself as an Art and Craft teacher, always surrounded by kids. I had the pleasure of handling almost the whole school and guiding them towards the annual Art and Craft Exhibition- 'CRAFTOONS'. A wonderful journey by itself. I had the pleasure of learning and teaching loads of creative stuffs, indulging students and co-teachers in the most cherishing crafting experiences ever. Every event in the school was a grand fete. I got teach drawing/painting, 3D mural, flower making, name plate mural, recycled jute/ sand vase, book markers, glass painting, bead vase, saw dust painting, sand painting, crochet, ice cream stick flower vase and much much more... I had found the best way to express my gratitude and respect to my craft teacher by inviting her as the judge for our show!! It was a moment of pride for her..

I have always been driven by the idea of my own boutique someday, which made me step into many boutiques and work for them with hand embroidery, fabric painting and designing. I had also started my own venture of jewellery making and embellishment works for friends and family, which actually din't take off well.

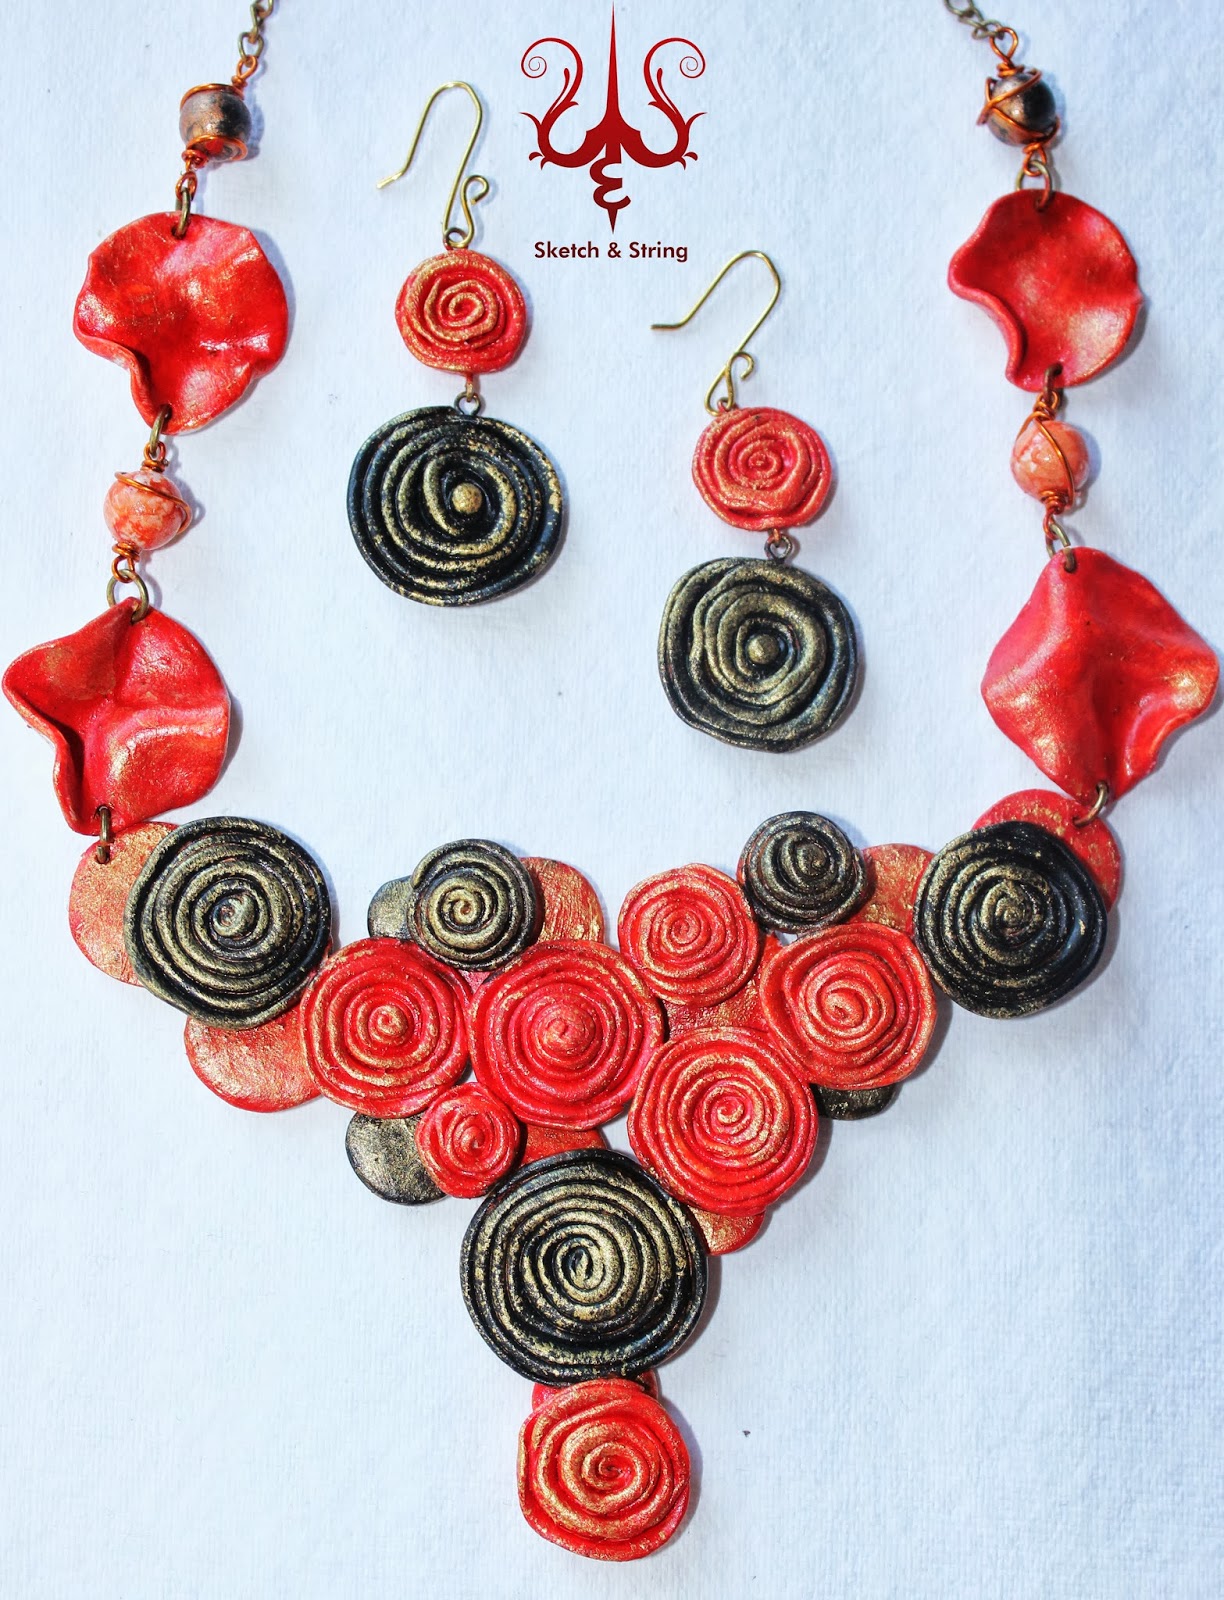
Marriage has not deterred my passion for Arts and Crafts as my husband is the next most important super man supporting me. I have always see my mother in him. The same kind of encouragement, same infinite love... Although moving thousands of miles away from home, bothers at the bottom of my heart, the rest of it is filled with appreciation and happiness for what I am doing today. Initially confused on an unknown land, I had no idea what I was upto.. Later on, I was pulled into one of the most versatile and thousand possibility medium of Polymer clay.. I started gaining knowledge about the medium for about 2 years and stated practically exploring it earlier this year giving birth to 'Sketch and String', www.facebook.com/SketchandString

In the meantime, I was also giving a try with my designing and making my designs sellable at http://www.spoonflower.com/designs
Sketch and string gave me new platform to display my lovely hand made jewellery, gave me new ideas, in fact, made me a stronger person, with new experiences..My passion for nail art, has now made me successfully complete my Masters Diploma in Nail Technician, which I find another doorway to express and explore art...

But something still pulls me back which I have to overcome. I find myself 'Jack of all trades but , Master of none'. Confusion has been a constant companion, which has made me learn many skills at random but failed to specialise.
Dreaming about my boutique everyday....

...Exploring....

...My heart filled thanks to my spiritual Master who sparked within me many ecstatic, scintillating, powerful, blissful moments in my life..

Don't forget to pop in to my other blog http://nailomaniac.blogspot.co.uk/ to explore the world of nails, manicure, nail art and more.


Saturday 17 August 2013

Birth of my blog

Hi,
My blog is finally born and I see before me a huge possibility to pour out myself, my talent, my journey in achieving what I am now and still further...
I would be more than happy to share my works, my interests, the whole process and would love to hear your comments and suggestions alike..

Brimming with appreciation for myself...

Don't forget to pop in to my other blog http://nailomaniac.blogspot.co.uk/ to explore the world of nails, manicure, nail art and more.